What is Android Service?
Android Service is a process runs on background indefinitely, but the special thing is about the android service is it doesn’t need user interaction. Android Services Examples are like playing music in background. It is a long running process in the background.
In this Android Service Sample code for Playing default ringtone on background tutorial will show you playing default ringtone on background. I have already discussed the sample code for playing music on background using android service in my previous tutorial. Before we proceed you need to go through the life cycle methods of android service.
Basics of an Android Service
Android service is an application component that is used to perform operations in the background such playing music, perform network operations etc. The service runs in the background even if the activity or application is destroyed.
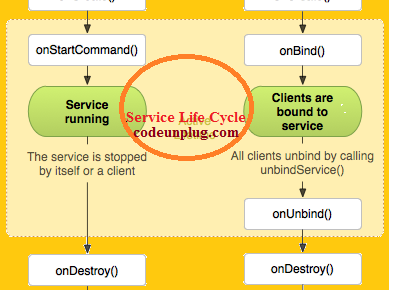
Additionally, android application component can bind to a service to interact with it by calling bindService(). When we call the method bindService(), it invokes the onBind() method. In the implementation of onBind() method, you must provide an interface that clients use to communicate with the service by returning an Ibinder.
A bound service can provide client-server interface for sending request, receiving results. Before proceed you should have go through the life cycle methods of android service. Please visit this link to learn about the life cycle methods of android service.
Creating a Service
To create android service we will create a normal java class extending the class android Service. And we should override the following methods onStartCommand() or onStart(), onBind(), onCreate(), onDestroy().
Defining android Service on Manifest
It is very important to define your service in your AndroidManifest.xml file as shown below.
<service android:name=".YourService" />
You need to put the above code inside application tag for every service.
Android Service Sample code for Playing default ringtone
Now let’s see a working Android Service sample code for playing default ringtone which is same as playing music on background using Service.
Creating an Android Studio Project
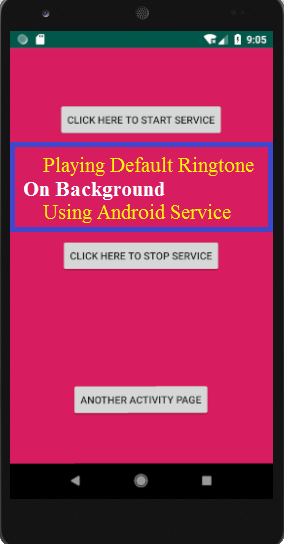
Create a new android studio project by selecting empty activity. Here I have created a layout containing three Button: one for starting the service , one for stopping the service and the last one for displaying another activity.
Creating User Interface
Once the project is loaded come inside activity_main.xml and create the following layout.
For the above UI you can use the following xml code.
activity_main.xml
 <?xml version="1.0" encoding="utf-8"?>
<RelativeLayout xmlns:android="http://schemas.android.com/apk/res/android"
    xmlns:app="http://schemas.android.com/apk/res-auto"
    xmlns:tools="http://schemas.android.com/tools"
    android:layout_width="match_parent"
    android:layout_height="match_parent"
    android:background="@color/colorAccent">


    <Button
        android:id="@+id/buttonStart"
        android:layout_width="wrap_content"
        android:layout_height="wrap_content"
        android:layout_alignParentTop="true"
        android:layout_centerHorizontal="true"
        android:layout_marginTop="74dp"
        android:text="Click Here To Start Service" />

    <Button
        android:id="@+id/buttonStop"
        android:layout_width="wrap_content"
        android:layout_height="wrap_content"
        android:layout_centerHorizontal="true"
        android:layout_centerVertical="true"
        android:text="Click Here To Stop Service" />

    <Button
        android:id="@+id/buttonNext"
        android:layout_width="wrap_content"
        android:layout_height="wrap_content"
        android:layout_alignParentBottom="true"
        android:layout_centerHorizontal="true"
        android:layout_marginBottom="63dp"
        android:text="Another Activity Page" />
</RelativeLayout>
Now we will code the MainActivity.java as below.
MainActivity.java
package com.example.serviceexample;

import android.app.Activity;
import android.content.Intent;

import android.os.Bundle;
import android.view.View;
import android.widget.Button;

public class MainActivity extends Activity implements View.OnClickListener {
    Button buttonStart, buttonStop,buttonNext;
    @Override
    protected void onCreate(Bundle savedInstanceState) {
        super.onCreate(savedInstanceState);
        setContentView(R.layout.activity_main);

        buttonStart = findViewById(R.id.buttonStart);
        buttonStop = findViewById(R.id.buttonStop);
        buttonNext =  findViewById(R.id.buttonNext);

        buttonStart.setOnClickListener(this);
        buttonStop.setOnClickListener(this);
        buttonNext.setOnClickListener(this);


    }
    public void onClick(View view) {
        if (view == buttonStart) {
            //starting service
            startService(new Intent(this, MyService.class));
        }if (view == buttonStop) {
            //stopping service
            stopService(new Intent(this, MyService.class));
        }else if (view==buttonNext){
            Intent intent=new Intent(this,AnotherPage.class);
            startActivity(intent);
        }
    }

}
Next we will create our service for playing default ringtone on background.
Creating Service
To create an android service you just need to create a new java class extending the built-in class Service and also override some methods that we discussed already.
Here I just created a java class named MyService.java.
MyService.java
package com.example.serviceexample;

import android.app.Service;
import android.content.Intent;
import android.media.MediaPlayer;
import android.os.IBinder;
import android.provider.Settings;

import android.widget.Toast;

public class MyService extends Service {
    MediaPlayer myPlayer;

    @Override
    public IBinder onBind(Intent intent) {
        return null;
    }

    @Override
    public int onStartCommand(Intent intent, int flags, int startId) {
        //getting systems default ringtone
        myPlayer = MediaPlayer.create(this,
                Settings.System.DEFAULT_RINGTONE_URI);
        Toast.makeText(this, "Ringtone playing", Toast.LENGTH_LONG).show();
        //setting loop play to true
        //this will make the ringtone continuously playing
        myPlayer.setLooping(false);
        //staring the player
        myPlayer.start();
        //we have some options for service
        //start sticky means service will be explicity started and stopped
        return START_STICKY;
    }

    @Override
    public void onDestroy() {
        Toast.makeText(this, "Ringtone playing Stopped", Toast.LENGTH_LONG).show();
        myPlayer.stop();
    }
}
As you can see in the above code, creation of MediaPlayer object for playing default ringtone on background using android service is shown below.
myPlayer =MediaPlayer.create(this,Settings.System.DEFAULT_RINGTONE_URI);
The above code selects the default ringtone of our mobile.
Defining Service in Manifest
Modify manifest file before starting the service, You need to define it inside AndroidManifest.xml as below.
AndroidManifest.xml
<?xml version="1.0" encoding="utf-8"?>
<manifest xmlns:android="http://schemas.android.com/apk/res/android"
    package="com.example.serviceexample">

    <application
        android:allowBackup="true"
        android:icon="@mipmap/ic_launcher"
        android:label="@string/app_name"
        android:roundIcon="@mipmap/ic_launcher_round"
        android:supportsRtl="true"
        android:theme="@style/AppTheme">

        <activity android:name=".MainActivity">
            <intent-filter>
                <action android:name="android.intent.action.MAIN" />

                <category android:name="android.intent.category.LAUNCHER" />
            </intent-filter>
        </activity>
        <activity android:name=".AnotherPage"></activity>
        <service android:name=".MyService"
            />
    </application>

</manifest>
Use of Third Button
We have created already three button in the layout activity_main.xml, first button created for starting service and second button for stopping service. The third button created for displaying an activity.
You just create a new java class named AnotherPage.java and its corresponding layout named activity_another_page.xml by right click on the app folder appears on the left panel of android studio and selects the empty activity (app->New->Activity->Empty Activity).
Modify both files AnotherPage.java, activity_another_page.xml as shown below.
AnotherPage.java
package com.example.serviceexample;

import android.app.Activity;

import android.os.Bundle;

public class AnotherPage extends Activity {

    @Override
    protected void onCreate(Bundle savedInstanceState) {
        super.onCreate(savedInstanceState);
        setContentView(R.layout.activity_another_page);
    }
}
activity_another_page.xml
<?xml version="1.0" encoding="utf-8"?>
<LinearLayout android:layout_width="match_parent" android:layout_height="match_parent"
    xmlns:android="http://schemas.android.com/apk/res/android">
   <TextView
       android:layout_width="match_parent"
       android:layout_height="match_parent"
       android:text="http://codeunplug.com"
       android:textSize="20dp"
       style="@style/Base.ThemeOverlay.AppCompat.Light"
       android:layout_gravity="center_horizontal"
       android:gravity="center"
       android:textColor="@color/colorAccent"/>
</LinearLayout>
Starting and Stopping Service
Now you can run your service project by click on run app (Shift+F10). When you will tap on “Click Here To Start Service” default ringtone will play. If you close your application you can see ringtone will keep ringing since it is playing with a Service that runs on background. To stop it you have to stop the service using “Click Here To Stop Service” button.