Android Rotate Animations in android is used to change the appearance and behavior of the objects. The Rotate animation will provide a good look and feel to your android applications.
Android Rotate Animations (Zoom Clockwise Fade Blink Move Slide) with Examples
Android Rotate Animations (Zoom Clockwise Fade Blink Move Slide) with Examples tutorials is used to teach you how to zoom image, rotate image in clockwise direction, fade your image, blink your image, move your image and finally slide your image using android programming.
To create an animation effect to the image in your android application, please follow below steps.
Create XML File to Define Animation
You need to create different xml file that defines the type of animation to perform in your android application in a new folder anim under res directory. In case anim folder not exists in res directory, create a new one.
To create a anim directory, right click on directory res –> new –> Android resource directory that appears on left side of your android studio. Click here to see the graphical view of directory creation.
Give name to Directory name as anim and Resource type as anim and click OK. Then you can see that anim folder that appears under res directory.
To use different animation in your android applications, we need to define different xml file for different animations.
To apply ZOOM effects we need to create an xml file under anim folder. Right click on anim>New>Animation resource file. Give File Name as myanimation. Then modify this myanimation.xml file as shown below.
myanimation.xml
 <?xml version="1.0" encoding="utf-8"?>
<set xmlns:android="http://schemas.android.com/apk/res/android">

    <scale xmlns:android="http://schemas.android.com/apk/res/android"
        android:fromXScale="0.5"
        android:toXScale="3.0"
        android:fromYScale="0.5"
        android:toYScale="3.0"
        android:duration="5000"
        android:pivotX="50%"
        android:pivotY="50%" >
    </scale>

    <scale xmlns:android="http://schemas.android.com/apk/res/android"
        android:startOffset="5000"
        android:fromXScale="3.0"
        android:toXScale="0.5"
        android:fromYScale="3.0"
        android:toYScale="0.5"
        android:duration="5000"
        android:pivotX="50%"
        android:pivotY="50%" >
    </scale>

</set>
To apply CLOCKWISE effects we need to create an xml file under anim folder. Right click on anim>New>Animation resource file. Give File Name as clockwise. Then modify this clockwise.xml file as shown below.
clockwise.xml
<?xml version="1.0" encoding="utf-8"?>
<set xmlns:android="http://schemas.android.com/apk/res/android">

    <rotate xmlns:android="http://schemas.android.com/apk/res/android"
        android:fromDegrees="0"
        android:toDegrees="360"
        android:pivotX="50%"
        android:pivotY="50%"
        android:duration="5000" >
    </rotate>

    <rotate xmlns:android="http://schemas.android.com/apk/res/android"
        android:startOffset="5000"
        android:fromDegrees="360"
        android:toDegrees="0"
        android:pivotX="50%"
        android:pivotY="50%"
        android:duration="5000" >
    </rotate>

</set>
To apply FADE effects we need to create an xml file under anim folder. Right click on anim>New>Animation resource file. Give File Name as fade. Then modify this fade.xml file as shown below.
fade.xml
 <?xml version="1.0" encoding="utf-8"?>
<set xmlns:android="http://schemas.android.com/apk/res/android"
    android:interpolator="@android:anim/accelerate_interpolator" >

    <alpha
        android:fromAlpha="0"
        android:toAlpha="1"
        android:duration="2000" >
    </alpha>

    <alpha
        android:startOffset="2000"
        android:fromAlpha="1"
        android:toAlpha="0"
        android:duration="2000" >
    </alpha>

</set>
To apply BLINK effects we need to create an xml file under anim folder. Right click on anim>New>Animation resource file. Give File Name as fade. Then modify this blink.xml file as shown below.
blink.xml
<?xml version="1.0" encoding="utf-8"?>
<set xmlns:android="http://schemas.android.com/apk/res/android">
    <alpha android:fromAlpha="0.0"
        android:toAlpha="1.0"
        android:interpolator="@android:anim/accelerate_interpolator"
        android:duration="600"
        android:repeatMode="reverse"
        android:repeatCount="infinite"/>
</set>
To apply MOVE effects we need to create an xml file under anim folder. Right click on anim>New>Animation resource file. Give File Name as fade. Then modify this move.xml file as shown below.
move.xml
 <?xml version="1.0" encoding="utf-8"?>
<set
    xmlns:android="http://schemas.android.com/apk/res/android"
    android:interpolator="@android:anim/linear_interpolator"
    android:fillAfter="true">

    <translate
        android:fromXDelta="0%p"
        android:toXDelta="75%p"
        android:duration="800" />
</set>
To apply SLIDE effects we need to create an xml file under anim folder. Right click on anim>New>Animation resource file. Give File Name as fade. Then modify this slide.xml file as shown below.
slide.xml
 <?xml version="1.0" encoding="utf-8"?>
<set xmlns:android="http://schemas.android.com/apk/res/android"
    android:fillAfter="true" >

    <scale
        android:duration="500"
        android:fromXScale="1.0"
        android:fromYScale="1.0"
        android:interpolator="@android:anim/linear_interpolator"
        android:toXScale="1.0"
        android:toYScale="0.0" />
</set>
Load Image using ImageView Class
In order to apply animation to your image , first load an image in the layout file using ImageView class. Copy any image from the internet and paste it on the drawable directory by right click on it. Give a name to your image when you paste it on the drawable directory. Here I just give my image name to abc.
<ImageView
    android:id="@+id/imageView"
    android:layout_width="wrap_content"
    android:layout_height="wrap_content"
    android:layout_alignLeft="@+id/textView"
    android:layout_alignRight="@+id/textView2"
    android:layout_below="@+id/textView2"
    android:src="@drawable/abc" />
Android Rotate Animation Layout
The layout for applying different animations in your image is shown below.
activity_main.xml
<?xml version="1.0" encoding="utf-8"?>
<RelativeLayout xmlns:android="http://schemas.android.com/apk/res/android"
    xmlns:tools="http://schemas.android.com/tools"
    android:layout_width="match_parent"
    android:layout_height="match_parent">
    <TextView
        android:layout_width="wrap_content"
        android:layout_height="wrap_content"
        android:text="Animation Effects"
        android:id="@+id/textView"
        android:textSize="35dp"
        android:layout_alignParentTop="true"
        android:layout_centerHorizontal="true" />

    <TextView
        android:layout_width="wrap_content"
        android:layout_height="wrap_content"
        android:text="codeunplug.com tutorial"
        android:id="@+id/textView2"
        android:textColor="#ff3eff0f"
        android:textSize="35dp"
        android:layout_below="@+id/textView"
        android:layout_centerHorizontal="true" />


    <ImageView
        android:id="@+id/imageView"
        android:layout_width="wrap_content"
        android:layout_height="wrap_content"
        android:layout_alignLeft="@+id/textView"
        android:layout_alignRight="@+id/textView2"
        android:layout_below="@+id/textView2"
        android:src="@drawable/abc" />

    <Button
        android:layout_width="wrap_content"
        android:layout_height="wrap_content"
        android:text="zoom"
        android:id="@+id/button"
        android:layout_below="@+id/imageView"
        android:layout_alignParentLeft="true"
        android:layout_marginTop="40dp"
        android:onClick="zoom"/>

    <Button
        android:layout_width="wrap_content"
        android:layout_height="wrap_content"
        android:text="clockwise"
        android:id="@+id/button2"
        android:layout_alignTop="@+id/button"
        android:layout_centerHorizontal="true"
        android:onClick="clockwise"/>

    <Button
        android:layout_width="wrap_content"
        android:layout_height="wrap_content"
        android:text="fade"
        android:id="@+id/button3"
        android:layout_alignTop="@+id/button2"
        android:layout_alignParentRight="true"
        android:onClick="fade"/>

    <Button
        android:layout_width="wrap_content"
        android:layout_height="wrap_content"
        android:text="blink"
        android:onClick="blink"
        android:id="@+id/button4"
        android:layout_below="@+id/button"
        android:layout_alignParentLeft="true" />

    <Button
        android:layout_width="wrap_content"
        android:layout_height="wrap_content"
        android:text="move"
        android:onClick="move"
        android:id="@+id/button5"
        android:layout_below="@+id/button2"
        android:layout_alignRight="@+id/button2"
        android:layout_alignLeft="@+id/button2"/>

    <Button
        android:id="@+id/button6"
        android:layout_width="wrap_content"
        android:layout_height="wrap_content"
        android:layout_below="@+id/button3"
        android:layout_marginLeft="67dp"
        android:layout_marginTop="4dp"
        android:layout_toRightOf="@+id/button5"
        android:onClick="slide"
        android:text="slide" />

</RelativeLayout>
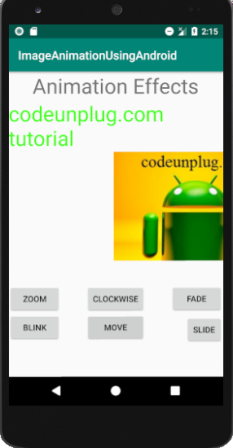
The graphical representation of layout created for Android Rotate Animation is looks like.
Android Rotate Animation Activity
The java file for applying different animation to your image is shown below. Modify your activity MainActivity.java.
MainActivity.java
package com.example.imageanimationusingandroid;
import android.support.v7.app.AppCompatActivity;
import android.os.Bundle;
import android.view.View;
import android.view.animation.Animation;
import android.view.animation.AnimationUtils;
import android.widget.ImageView;

public class MainActivity extends AppCompatActivity {

    @Override
    protected void onCreate(Bundle savedInstanceState) {
        super.onCreate(savedInstanceState);
        setContentView(R.layout.activity_main);
    }
    public void clockwise(View view){

        ImageView image = (ImageView)findViewById(R.id.imageView);
        Animation animation = AnimationUtils.loadAnimation(getApplicationContext(), R.anim.clockwise);
        image.startAnimation(animation);
    }

    public void zoom(View view){
        ImageView image = (ImageView)findViewById(R.id.imageView);
        Animation animation1 = AnimationUtils.loadAnimation(getApplicationContext(), R.anim.myanimation);
        image.startAnimation(animation1);
    }

    public void fade(View view){
        ImageView image = (ImageView)findViewById(R.id.imageView);
        Animation animation1 =
                AnimationUtils.loadAnimation(getApplicationContext(), R.anim.fade);
        image.startAnimation(animation1);
    }

    public void blink(View view){
        ImageView image = (ImageView)findViewById(R.id.imageView);
        Animation animation1 =
                AnimationUtils.loadAnimation(getApplicationContext(), R.anim.blink);
        image.startAnimation(animation1);
    }

    public void move(View view){
        ImageView image = (ImageView)findViewById(R.id.imageView);
        Animation animation1 =
                AnimationUtils.loadAnimation(getApplicationContext(), R.anim.move);
        image.startAnimation(animation1);
    }

    public void slide(View view){
        ImageView image = (ImageView)findViewById(R.id.imageView);
        Animation animation1 =
                AnimationUtils.loadAnimation(getApplicationContext(), R.anim.slide);
        image.startAnimation(animation1);
    }

}
AndroidManifest.xml
<?xml version="1.0" encoding="utf-8"?>
<manifest xmlns:android="http://schemas.android.com/apk/res/android"
    package="com.example.imageanimationusingandroid">

    <application
        android:allowBackup="true"
        android:icon="@mipmap/ic_launcher"
        android:label="@string/app_name"
        android:roundIcon="@mipmap/ic_launcher_round"
        android:supportsRtl="true"
        android:theme="@style/AppTheme">
        <activity android:name=".MainActivity">
            <intent-filter>
                <action android:name="android.intent.action.MAIN" />

                <category android:name="android.intent.category.LAUNCHER" />
            </intent-filter>
        </activity>
    </application>

</manifest>
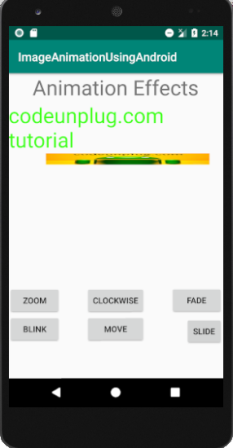
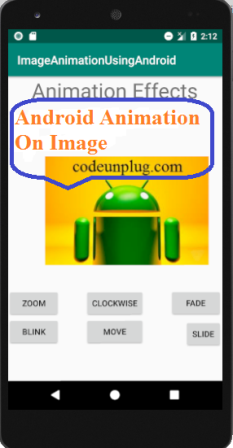
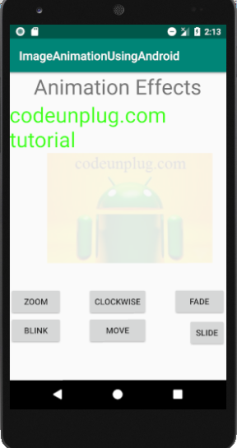
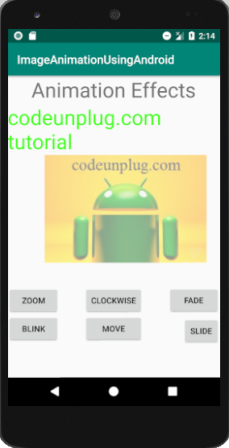
The output of the Android Rotate Animation is shown below.
When you click on Zoom button.
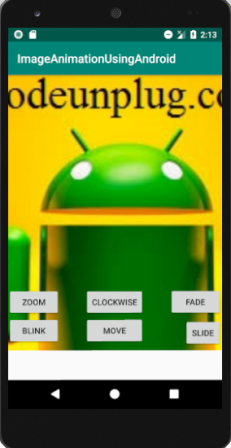
When you click on Clockwise button.

When you click on Fade button.
When you click on Blink button.
When you click on Move button.
When you click on Slide button.