Android application for read and display user input is a simple example for a beginner to learn Android programming. In this tutorial we are going to learn how to read and display user input using android studio. In here we simply ask the user to enter the name and we display that name in another page.
If you are totally new to android programming and don’t know anything about android programming this is a simple android application for learning android programming.
Before going to start with the project “Android Application For Read And Display User Input ” make sure that you have installed android studio successfully in your system.
Start a new project by clicking on the empty activity. Give your android project name as you wish. Here we have to create a EditText control to read user input and a button to submit the user entered name. When you create a new project you can see a MainActivity.java file and its corresponding layout name activity_main.xml file.
Android : How to Read And Display User Input
Modify both file MainActivity.java and activity_main.xml as shown below.
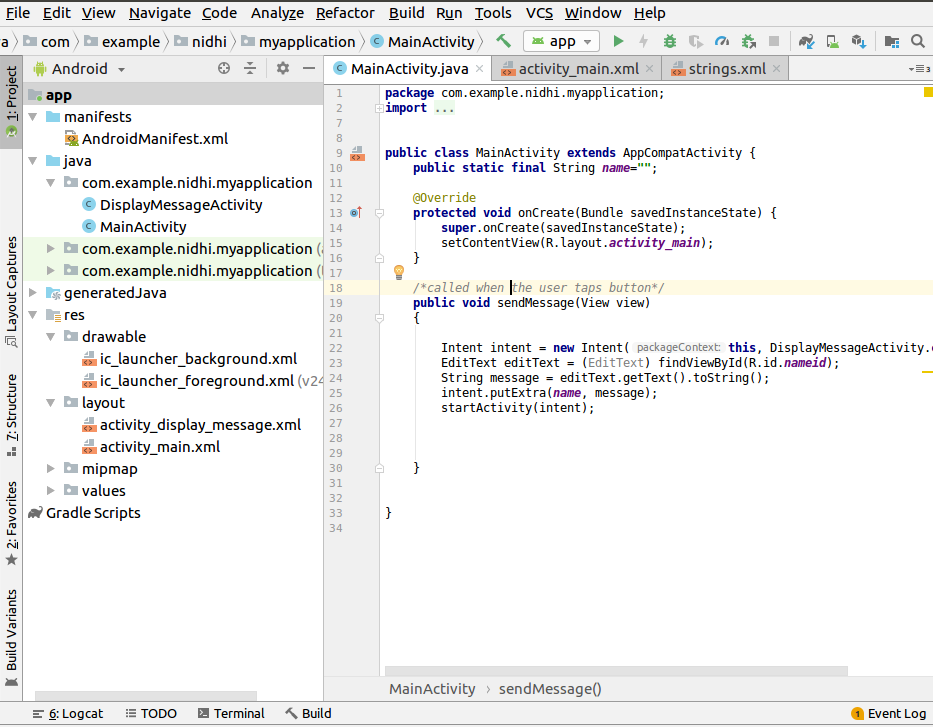
MainActivity.java
package com.example.nidhi.myapplication;

import android.content.Intent;

import android.support.v7.app.AppCompatActivity;

import android.os.Bundle;

import android.view.View;

import android.widget.EditText;

public class MainActivity extends AppCompatActivity {

    public static final String name="";

    @Override

    protected void onCreate(Bundle savedInstanceState) {

        super.onCreate(savedInstanceState);

        setContentView(R.layout.activity_main);

    }

    /*called when the user taps button*/

    public void sendMessage(View view)

    {

        Intent intent = new Intent(this, DisplayMessageActivity.class);

        EditText editText = (EditText) findViewById(R.id.nameid);

        String message = editText.getText().toString();

        intent.putExtra(name, message);

        startActivity(intent);

    }

}
activity_main.xml
<?xml version="1.0" encoding="utf-8"?>

<android.support.constraint.ConstraintLayout xmlns:android="http://schemas.android.com/apk/res/android"

    xmlns:app="http://schemas.android.com/apk/res-auto"

    xmlns:tools="http://schemas.android.com/tools"

    android:layout_width="match_parent"

    android:layout_height="match_parent"

    tools:context="com.example.nidhi.myapplication.MainActivity">

    <EditText

        android:id="@+id/nameid"

        android:layout_width="0dp"

        android:layout_height="wrap_content"

        android:layout_marginBottom="450dp"

        android:layout_marginTop="24dp"

        android:ems="16"

        android:hint="@string/username"

        android:inputType="textPersonName"

        app:layout_constraintBottom_toBottomOf="parent"

        app:layout_constraintEnd_toStartOf="@+id/button"

        app:layout_constraintHorizontal_bias="0.5"

        app:layout_constraintStart_toStartOf="parent"

        app:layout_constraintTop_toTopOf="parent" />

    <Button

        android:id="@+id/button"

        android:layout_width="wrap_content"

        android:layout_height="68dp"

        android:layout_marginEnd="16dp"

        android:layout_marginStart="16dp"

        android:layout_marginTop="100dp"

        android:onClick="sendMessage"

        android:text="@string/Button"

        app:layout_constraintBottom_toTopOf="@+id/nameid"

        app:layout_constraintEnd_toEndOf="parent"

        app:layout_constraintHorizontal_bias="0.5"

        app:layout_constraintStart_toEndOf="@+id/nameid"

        app:layout_constraintTop_toTopOf="parent"

        tools:text="Submit" />

</android.support.constraint.ConstraintLayout>
You can see that the EditText control in the activity_main.xml file in res/layout found in the left panel of android studio, the property of EditText control android:hint=”@string/username” specified in the string.xml file.
The Button property android:text=”@string/Button” is also specified in the string.xml file.
We can also specify the ‘onClick’ property of button in the layout itself (android:onClick=”sendMessage”). So that when you click on the button it will call the ‘sendMessage’ method. See the code for string.xml.
String.xml
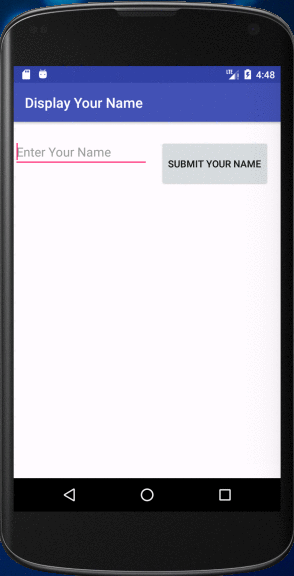
<resources>
    <string name="app_name">Display Your Name</string>
    <string name="username">Enter Your Name</string>
    <string name="Button">SUBMIT YOUR NAME</string>
    </resources>
Layout of the screen now as shown below.
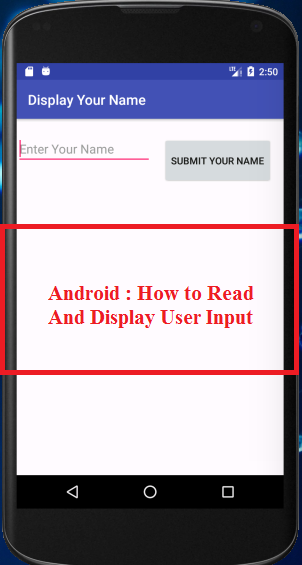
When you tap on the Button named “SUBMIT YOUR NAME” it will call the ‘sendMessage’ method. This the code for collecting the user name and send this name to another activity name called DisplayMessageActivity.java for displaying the user entered name.
/*called when the user taps button*/

    public void sendMessage(View view)

    {

        Intent intent = new Intent(this, DisplayMessageActivity.class);

        EditText editText = (EditText) findViewById(R.id.nameid);

        String message = editText.getText().toString();

        intent.putExtra(name, message);

        startActivity(intent);

    }
Let’s add another activity by right-click on app in the left-hand panel and select New → Activity → Empty Activity.Give it a name — here I just named activity name is “DisplayMessageActivity” and specify a layout name also , activity_display_message.
Create a TextView control in activity_display_message.xml for displaying the user input.
Click Finish and you should see two new files created — a new Java file, DisplayMessageActivity.java and new layout XML file, activity_display_message.xml.
DisplayMessageActivity.java
package com.example.nidhi.myapplication;

import android.content.Intent;

import android.support.v7.app.AppCompatActivity;

import android.os.Bundle;

import android.widget.TextView;

public class DisplayMessageActivity extends AppCompatActivity {

    @Override

    protected void onCreate(Bundle savedInstanceState) {

        super.onCreate(savedInstanceState);

        setContentView(R.layout.activity_display_message);

        // Get the Intent that started this activity and extract the string

        Intent intent = getIntent();

        String message = intent.getStringExtra(MainActivity.name);

        // Capture the layout's TextView and set the string as its text

        TextView textView = findViewById(R.id.displayid);

        textView.setText(message);

    }

}
activity_display_message.xml
<?xml version="1.0" encoding="utf-8"?>

<LinearLayout xmlns:android="http://schemas.android.com/apk/res/android" android:layout_height="200dp" android:layout_width="match_parent" android:orientation="vertical">

    <TextView

        android:layout_gravity="left"

        android:textSize="25dp"

        android:id="@+id/displayid"

        android:layout_width="wrap_content"

        android:layout_height="wrap_content"

        android:text="For displaying your name"

        />

</LinearLayout>
Now the structure of the project looks like
After modifying all the files ,now you run the app by clicking on the Tool menu.