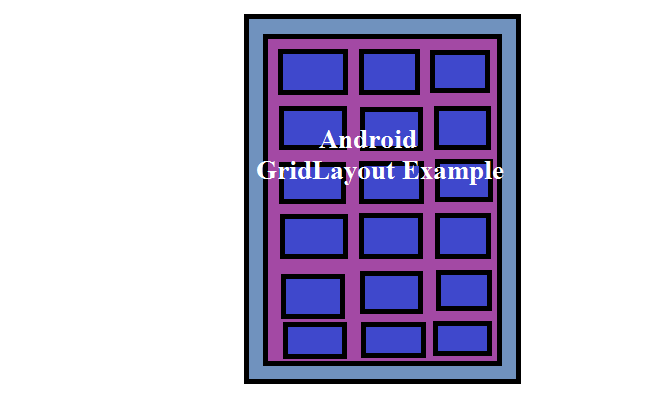
Android GridLayout places the views in a two-dimensional rectangular scrollable grid (rows and columns).
Android GridLayouts in XML Resource Files
Android GridLayout is declared within an XML file using the <GridLayout> element tag. For example:
<GridLayout xmlns:android="http://schemas.android.com/apk/res/android"
    xmlns:tools="http://schemas.android.com/tools"
    android:id="@+id/GridLayout1"
    android:layout_width="wrap_content"
    android:layout_height="wrap_content">
</GridLayout>
Android Gridlayout Example
android.widget.GridLayout is a layout manager used to arrange child views in grid layout. The number of rows and columns within the grid layout can be declared using the android:rowCount and android:columnCount properties.
The orientation property of the GridLayout may optionally be defined via the android:orientation property. The value of orientation may be either vertical or horizontal.
If no rowCount and columnCount values are declared for grid layout the child views is positioned automatically in the grid form by the GridLayout based on the available space on the screen.
You can also use child view’s layout_rowSpan or layout_columnSpan property to merge rows or columns.
The android:layout_gravity=”left|top” property specifies each view placed in the top left hand corner of the encapsulating cell.
A view can be placed within a specific cell by specifying the intersecting row and column number of the destination cell.
The following android:layout_column=”2″ and android:layout_row=”1″ propert indicates that view will be placed in the cell and row 1, column 2 of the parent GridLayout.
In the case of android GridLayout property android:layout_columnSpan=”3″ and android:layout_rowSpan=”2″ view is configured to span 3 columns and 2 rows and to fill the space available both horizontally and vertically.
Add Views to Grid Layout
You can update the XML code you have in your activity_main.xml file with the current code below.
activity_main.xml
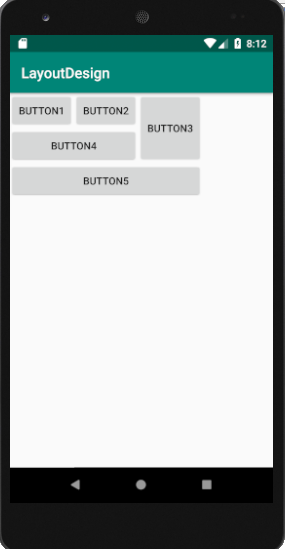
 <?xml version="1.0" encoding="utf-8"?>
<!--Relative Layout Is Used-->
<GridLayout xmlns:android="http://schemas.android.com/apk/res/android"
    xmlns:tools="http://schemas.android.com/tools"
    android:id="@+id/GridLayout1"
    android:layout_width="wrap_content"
    android:layout_height="wrap_content"
    android:columnCount="4"
    android:rowCount="4"
    android:orientation="horizontal">
    <Button
        android:id="@+id/button3"
        android:layout_column="0"
        android:layout_gravity="left|top"
        android:layout_row="0"
        android:text="Button1" />

    <Button
        android:id="@+id/button1"
        android:layout_column="1"
        android:layout_gravity="left|top"
        android:layout_row="0"
        android:text="Button2" />

    <Button
        android:id="@+id/button2"
        android:layout_column="2"
        android:layout_gravity="fill_vertical"
        android:layout_row="0"
        android:layout_rowSpan="2"
        android:text="Button3" />

    <Button
        android:id="@+id/button4"
        android:layout_column="0"
        android:layout_columnSpan="2"
        android:layout_gravity="fill_horizontal"
        android:layout_row="1"
        android:text="Button4" />
    <Button
        android:id="@+id/button5"
        android:layout_column="0"
        android:layout_columnSpan="3"
        android:layout_gravity="fill_horizontal"
        android:layout_row="2"
        android:text="Button5" />
</GridLayout>
The graphical presentation of the above xml layout code of activity_main.xml is shown below.