Styles on Android allows you to separate your app design from the UI structure and behavior, similar to style sheets or CSS usage in web design. That is we can separate the design of our app from the structure of the app.
Android Style
A style is a collection of attributes that is used to give appearance for Views created in your android layout XML file. The attributes such as font color, font size, background color, and much more can be set using style.
There are usually two approaches used to modifying the look and feel of your Android apps.
1. The first approach involves directly modifying the individual properties of your views in layout XML file itself. This approach is feasible only if you are working on a simple app that has a small number of views and activities.
In this case we can directly apply styles to the individual Views in the app as shown below. We can apply styles directly to the Views in the XML file.
activity_main.xml
<?xml version="1.0" encoding="utf-8"?>
<LinearLayout android:layout_width="match_parent"
    android:layout_height="match_parent"
    android:orientation="vertical"
    xmlns:android="http://schemas.android.com/apk/res/android" >

    <TextView
        android:layout_width="wrap_content"
        android:layout_height="wrap_content"
        android:text="Hello World!"
        android:textColor="@color/colorPrimary"
        android:textSize="50dp"
        android:fontFamily="sans-serif-black"
        android:gravity="center"
        android:textStyle="bold"
        />
</LinearLayout>
2. The second approach involves creating and using custom styles in the styles.xml file. You can declare your styles that you want to apply for a View in the styles.xml file.
Style is declared in a style resource file in res/values/, usually named styles.xml.
Create and apply a style
To create a new style, open your project’s res/values/styles.xml file. The general syntax of your styles.xml file when you create a new project is as follows. You can see the style tag inside the styles.xml file.
style.xml
<resources>
    <!-- Base application theme. -->
    <style name="AppTheme" parent="Theme.AppCompat.Light.DarkActionBar">
        <!-- Customize your theme here. -->
        <item name="colorPrimary">@color/colorPrimary</item>
        <item name="colorPrimaryDark">@color/colorPrimaryDark</item>
        <item name="colorAccent">@color/colorAccent</item>
    </style>
</resources>
For each style you want to create for views, follow these steps:
1. Add a <style> element with a name that uniquely identifies the style.
2. Add an <item> element for each style attribute you want to define.
The name in each item specifies an attribute you want to use as an XML attribute in your layout. The value in the <item> element is the value for that attribute.
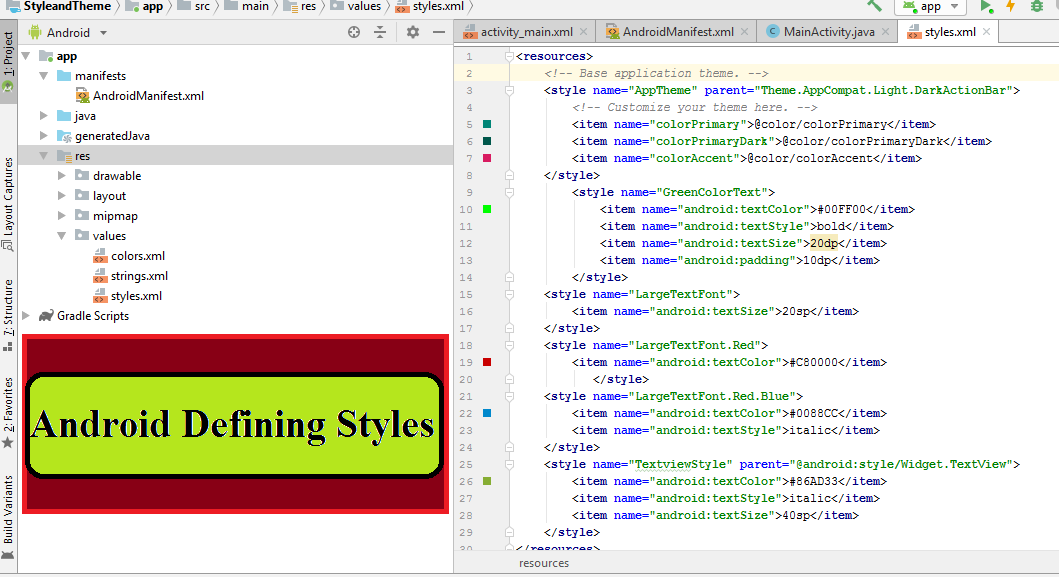
Android Defining Styles
To define a set of styles,you need to modify the styles.xml file  in /res/values directory of our project.<resources>

    <!-- Base application theme. -->
    <style name="AppTheme" parent="Theme.AppCompat.Light.DarkActionBar">
        <!-- Customize your theme here. -->
        <item name="colorPrimary">@color/colorPrimary</item>
        <item name="colorPrimaryDark">@color/colorPrimaryDark</item>
        <item name="colorAccent">@color/colorAccent</item>
    </style>

        <style name="GreenColorText">
            <item name="android:textColor">#00FF00</item>            <item name="android:textStyle">bold</item>
            <item name="android:textSize">20dp</item>
            <item name="android:padding">10dp</item>        </style>
</resources>
Android Apply a Style to View
<?xml version="1.0" encoding="utf-8"?>
<LinearLayout android:layout_width="match_parent"
    android:layout_height="match_parent"
    android:orientation="vertical"
    xmlns:android="http://schemas.android.com/apk/res/android" >

    <TextView
        android:layout_width="wrap_content"
        android:layout_height="wrap_content"
        android:text="Hello World!"
        style="@style/GreenColorText"
        android:textSize="50dp"
        android:fontFamily="sans-serif-black"
        android:gravity="center"
        android:textStyle="bold"
        />
</LinearLayout>
Inheriting Styles
We can also inherit the styles that we created our self or from the styles that are built into the platform.
<style name="LargeTextFont">
    <item name="android:textSize">20sp</item>
</style>

<style name="LargeGreenColor" parent="@style/LargeTextFont">
    <item name="android:textColor">#00FF00</item>
</style>
If you want to inherit styles that you have defined already in the styles.xml file, you do not need to use the parent attribute of style element. Instead, prefix the name of the style you want to inherit to the name of your new style, separated by a period.
<style name="LargeTextFont">
    <item name="android:textSize">20sp</item>
</style>

<style name="LargeTextFont.Red">
    <item name="android:textColor">#C80000</item>
</style>
You can continue to extend styles inheriting from them by using multiple periods:
<style name="LargeTextFont">
    <item name="android:textSize">20sp</item>
</style>

<style name="LargeTextFont.Red">
    <item name="android:textColor">#C80000</item>
       </style>
<style name="LargeTextFont.Red.Blue">
    <item name="android:textColor">#0088CC</item>
    <item name="android:textStyle">italic</item>
</style>
The newly created style referenced from Textview as
@style/LargeTextFont.Red.Blue
.
You can also inherit built-in platform style Widget.TextView using parent attribute in <style> element.
<style name="TextviewStyle" parent="@android:style/Widget.TextView">
    <item name="android:textColor">#86AD33</item>
    <item name="android:textStyle">italic</item>
    <item name="android:textSize">40sp</item>
</style>
The structure of your project now looks like :