Context Menu Creation in Android
Context Menu creation in android appears when the user performs a long press or click on an element and it is useful to implement actions that affect the selected content.
The android Context Menu is same as the menu which displayed on right click in Windows or Linux.
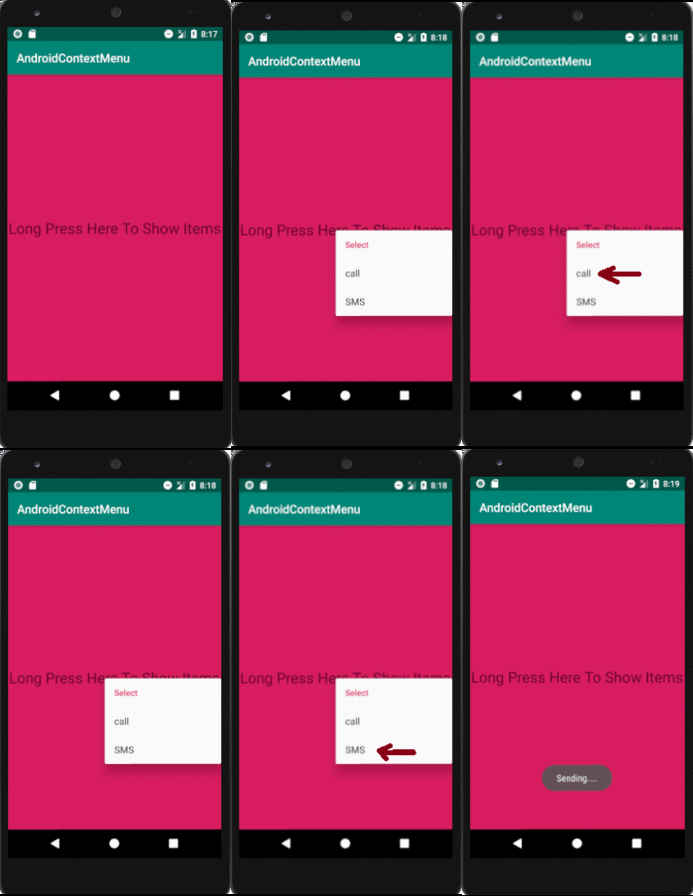
Following is the pictorial representation of using Context Menu in our android applications.

Usage of Context Menu in android application development is standard for system functions such as altering home screen icons and it is a key ingredient in many android applications.
Create a new android application using android studio
Create a new project in android studio by go to File>New>New Project and select Empty Activity. In case if you are not aware of creating an android application in android studio check this article Android studio installation in Ubuntu.
Alter the name to suit your own layout file and activity class at the time of new project creation. In this case, the XML layout file is saved as “activity_main.xml” in the application’s “res/layout” folder. Open main activity file MainActivity.java from \java\com.example.androidcontextmenu path.
This is an android application for creating context menu that contains two options. The first option is for calling to a specific number and the second option is to send SMS. This is only a simulation for achieving the call option and SMS option in the context menu.
Add a UI Element to Long-Press
Now open an activity_main.xml file from \res\layout path and write the code like as shown below.
activity_main.xml
<?xml version="1.0" encoding="utf-8"?>
<android.support.constraint.ConstraintLayout xmlns:android="http://schemas.android.com/apk/res/android"
    xmlns:app="http://schemas.android.com/apk/res-auto"
    xmlns:tools="http://schemas.android.com/tools"
    android:layout_width="match_parent"
    android:layout_height="match_parent"
    android:background="@color/colorAccent"
    tools:context=".MainActivity">
    <TextView
        android:layout_width="wrap_content"
        android:layout_height="wrap_content"
        android:text="Long Press Here To Show Items"
        android:id="@+id/tv1"
        app:layout_constraintBottom_toBottomOf="parent"
        app:layout_constraintLeft_toLeftOf="parent"
        app:layout_constraintRight_toRightOf="parent"
        app:layout_constraintTop_toTopOf="parent"
        android:textSize="25dp"
        />
</android.support.constraint.ConstraintLayout>
Open main activity file MainActivity.java from \java\com.example.androidcontextmenu path and write the code like as shown below.
MainActivity.java
package com.example.androidcontextmenu;
import android.Manifest;
import android.app.Activity;
import android.content.Intent;
import android.content.pm.PackageManager;
import android.net.Uri;
import android.provider.Telephony;
import android.support.v4.app.ActivityCompat;
import android.support.v7.app.AppCompatActivity;
import android.os.Bundle;
import android.view.ContextMenu;
import android.view.MenuItem;
import android.view.View;
import android.widget.TextView;
import android.widget.Toast;

public class MainActivity extends AppCompatActivity {
    TextView tv;
    private static final int Request_Read_Contacts=0;
    private static final int Request_Code_permission=2;
    @Override
    protected void onCreate(Bundle savedInstanceState) {
        super.onCreate(savedInstanceState);
        setContentView(R.layout.activity_main);
        tv=(TextView)findViewById(R.id.tv1);
        registerForContextMenu(tv);
        String cPermission= Manifest.permission.CALL_PHONE;
        try{
            if (ActivityCompat.checkSelfPermission(this,cPermission)!= PackageManager.PERMISSION_GRANTED){

                ActivityCompat.requestPermissions(this,new String[]{cPermission},Request_Code_permission);
            }

        }
        catch(Exception e){
            e.printStackTrace();

        }
    }
    @Override
    public void onCreateContextMenu(ContextMenu menu, View v, ContextMenu.ContextMenuInfo menuInfo)
    {

        super.onCreateContextMenu(menu,v,menuInfo);
        menu.setHeaderTitle("Select");
        menu.add("call");
        menu.add("SMS");
    }
    @Override
    public boolean onContextItemSelected(MenuItem item){

        if (item.getTitle().toString().equals("call"))
        {

            Toast.makeText(this,"Calling....",Toast.LENGTH_LONG).show();
            Intent in=new Intent(Intent.ACTION_CALL, Uri.parse("tel:1234567890"));
            try{
                startActivity(in);
            }
            catch (android.content.ActivityNotFoundException ex){
                Toast.makeText(this,"couldnot make call....",Toast.LENGTH_LONG).show();
            }

        }
        else if (item.getTitle().toString().equals("SMS"))
        {
            Toast.makeText(this,"Sending....",Toast.LENGTH_LONG).show();
        }
        return super.onContextItemSelected(item);
    }
}
Open file AndroidManifest.xml from \app\manifets path and write the code like as shown below.
AndroidManifest.xml
<?xml version="1.0" encoding="utf-8"?>
<manifest xmlns:android="http://schemas.android.com/apk/res/android"
    package="com.example.androidcontextmenu">
    <uses-sdk android:maxSdkVersion="7"/>
    <uses-permission android:name="android.permission.CALL_PHONE"/>
    <uses-permission android:name="android.permission.READ_PHONE_STATE"/>

    <application
        android:allowBackup="true"
        android:icon="@mipmap/ic_launcher"
        android:label="@string/app_name"
        android:roundIcon="@mipmap/ic_launcher_round"
        android:supportsRtl="true"
        android:theme="@style/AppTheme">
        <activity android:name=".MainActivity">
            <intent-filter>
                <action android:name="android.intent.action.MAIN" />

                <category android:name="android.intent.category.LAUNCHER" />
            </intent-filter>
        </activity>
    </application>
</manifest>
Output :


