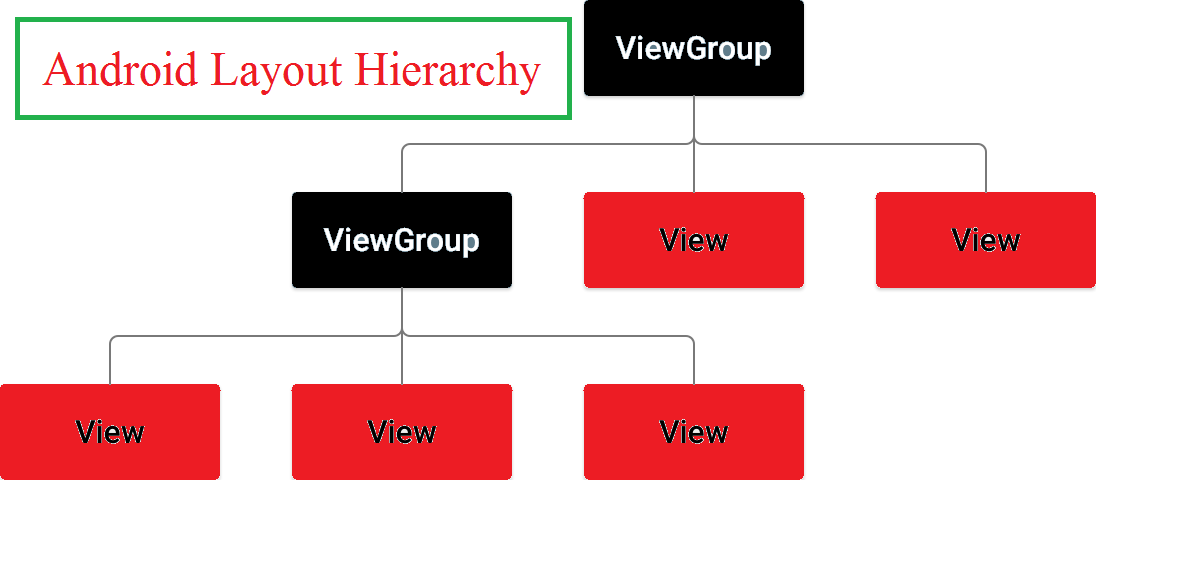
Android layouts defines the structure for a user interface in your android app screen. All user elements are aligned in the screen using different layout provided by the android. View is the base class for widgets, which are used to create user interactive user interface (UI) components like buttons, EditText, TextView etc. The ViewGroup (subclass of View) is a container that holds other Views or other ViewGroups. The layout is not visible to the users. Layout hierarchy is shown below.

If you’re just new to the Android programming, you may not even know that each screen (Android Activity) in your application has controls (eg: View) composed within different Layouts. Let’s see what are the main Layout Types for designing Android app.
What is a Layout ?
Layout defines a visual structure for the UI components in the Activity (or android Screen). We can say that Layouts are considered as a set of rules according to which controls (Button, TextView, EditText input fields etc.) are placed in your Activity ( or Android app Screen).
In this tutorial I am discussing about the different layouts using in android application development. The different layouts in android application development are
1. Linear Layout.
2. Relative Layout.
3. Table Layout.
4. Grid Layout.
5. Absolute Layout.
6. Frame Layout.
Android Layout Types
1. LinearLayout
LinearLayout is a ViewGroup that aligns all user controls (eg: Button, TextView, EditText etc.) in a single direction either vertically or horizontally using the orientation property of LinearLayout.
2. RelativeLayout
RelativeLayout is a ViewGroup that displays all user controls in relative positions. For example we can align one button to the right of other button or other UI.
3.TableLayout
TableLayout is a ViewGroup that groups all user controls in your android screen into rows and columns. There is no border in TableLayout by default.
4. GridLayout
GridView is a ViewGroup that aligns all your UI components in a two-dimensional grid. In GridLayout the items are arranged in a strict grid. The UI components are displayed as a grid in the android screen.
5. AbsoluteLayout
AbsoluteLayout is a ViewGroup that enables you to specify the positions of your UI components in exact locations (x/y coordinates).
6. FrameLayout
FrameLayout is a ViewGroup designed to display a single item at a time . A FrameLayout can have multiple UI components but each element will be positioned based on the top left of the screen like a stack. The UI component added last in the FrameLayout will be displayed on top of the android screen. For example we can add a TextView on top of an image.


2 Replies to “Android Layouts Tutorial”